安装
简介
Hexo是一个快速、简洁且高效的博客框架。Hexo使用Markdown(或其他渲染引擎)解析文章,在几秒内,即可利用靓丽的主题生成静态网页。
详细内容请查看Hexo官方文档
安装
安装Hexo前,需先安装下列应用程序:
Node.js (Node.js 版本需不低于8.6,建议使用 Node.js 10.0 及以上版本)Git
安装完成之后,在Git Bash命令行输入下列命令即可自行下载安装hexo
1 $ npm install -g hexo-cli
建站
安装Hexo完成后,执行下列命令,Hexo将会在指定文件夹中新建所需要的文件。
1
2
3
$ hexo init <folder> $ cd <folder> $ npm install
新建完成后,指定文件夹的目录如下:
1
2
3
4
5
6
7
8
. ├── _config .yml ├── package.json ├── scaffolds ├── source | ├── _drafts | └── _posts └── themes
hexo相关命令均在站点目录下,用Git Bash运行。
站点配置文件:站点目录下的_config.yml 。路径为<folder>\_config.yml
主题配置文件:站点目录下的themes 文件夹下的,主题文件夹下的_config.yml 。路径为<folder>\themes\<主题文件夹>\_config.yml
修改站点配置文件,以下信息都在站点配置文件中,具体内容根据用户自身情况修改。
参数
描述
title
网站标题
subtitle
网站副标题
description
网站描述
keywords
网站的关键词。使用半角逗号 , 分隔多个关键词。
author
您的名字
language
网站使用的语言,简体中文为 zh-CN
timezone
网站时区。Hexo 默认使用您电脑的时区。时区列表。比如说:America/New_York, Japan, 和 UTC 。
参数
描述
默认值
url
网址
root
网站根目录
permalink
文章的 永久链接 格式
:year/:month/:day/:title/
permalink_defaults
永久链接中各部分的默认值
pretty_urls
改写 permalink 的值来美化 URL
pretty_urls.trailing_index
是否在永久链接中保留尾部的 index.html,设置为 false 时去除
true
此外站点配置文件中的new_post_name 参数是设置通过命令行的方式新建文章时该文章所对应.md文件的名字,例如你可以修改为:
1 2 3 new_post_name: :year-:month-:day-:title.md
如果您的网站存放在子目录中,例如 http://yoursite.com/blog, 则请将您的 url 设为 http://yoursite.com/blog 并把 root 设为/blog/。
1 2 3 4 pretty_urls: trailing_index: false
启动服务器。在路径下,命令行(即Git Bash)输入以下命令,运行即可:
或简写为:
浏览器访问网址: http://localhost:4000/ ,便可预览Hexo博客。
部署
在你的GitHub账号里新建仓库, 仓库名为:<Github账号名称>.github.io,并添加SSH key。
修改_config.yml (在站点目录下)。文件末尾修改为:
1 2 3 4 5 6 deploy: type: git repo: https://github.com/<Github账号名称>/<Github账号名称>.github.io.git branch: master
安装hexo-deployer-git 插件。在命令行(即Git Bash)运行以下命令即可:
1 $ npm install hexo-deployer-git --save
推送到GithubPages。在命令行(即Git Bash)依次输入以下命令, 返回INFO Deploy done: git即成功推送:
或输入
或输入
等待1分钟左右,浏览器访问网址:https://<Github账号名称>.github.io
选择主题
应用主题
将下载好的主题文件夹,粘贴到站点目录的themes下。
更改站点配置文件_config.yml 的theme字段,为主题文件夹的名称:
主题优化 以下均为 Next 7+ 版本的主题优化,Next主题配置文件中已经提供了很多功能,需要使用时只需稍微修改即可。
设定站点建立时间
打开themes/next/下的_config.yml,查找since(默认为当前年份):
设置主题风格
打开themes/next/下的_config.yml,查找Schemes,根据个人爱好选择不同的主题风格,将前面的注释“#”删除即可应用该风格。
设置代码高亮主题
在站点配置文件中的highlight字段可以设置代码格式:
1 2 3 4 5 6 7 highlight: enable: true line_number: true auto_detect: true tab_replace: ''
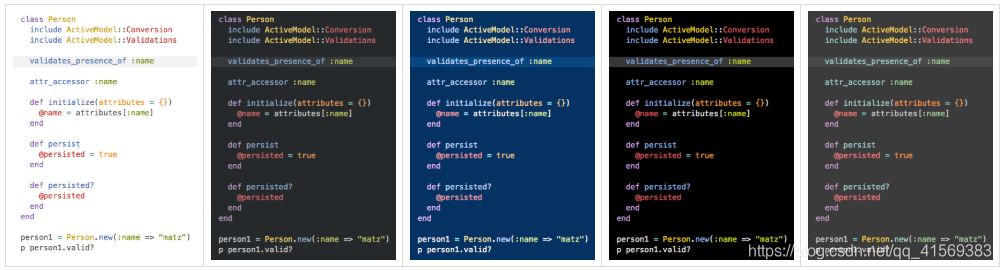
NexT 使用 Tomorrow Theme 作为代码高亮,共有5款主题供你选择。 NexT 默认使用的是 白色的 normal 主题,可选的值有 normal,night, night blue, night bright, night eighties,依次如下图所示:
更改主题配置文件中的 highlight_theme 字段,将其值设定成你所喜爱的高亮主题,copy_button.style 字段可以设置代码块复制按钮的风格,例如:
1 2 3 4 5 6 7 8 9 10 11 12 codeblock: highlight_theme: night eighties copy_button: enable: true show_result: true style: mac
代码块Mac Panel特效
在上述设置代码高亮主题中将copy_button 设为 true,并将style 设置为 mac;
打开F:\themes\next\source\css\_common\scaffolding\highlight\copy-code.styl文件,做如下修改,具体值可自行设定:
1 2 3 4 5 6 7 8 9 10 11 12 13 14 15 16 17 18 19 20 21 22 23 24 25 26 27 28 29 30 31 32 33 34 35 36 37 38 39 40 41 42 43 44 45 46 if (hexo-config('codeblock.copy_button.style') == 'mac') { .highlight-wrap { background : #21252b ; border-radius : 5px ; padding-top : 33px ; position : relative; box-shadow : 18px 18px 15px 0px rgba (0 , 0 , 0 , 0.4 ); margin : 35px 0 ; margin-top : 10px ; margin-bottom : 28px ; ::-webkit-scrollbar { height : 10px ; } ::-webkit-scrollbar-track { -webkit-box-shadow : inset 0 0 10px rgba (255 , 255 , 255 , 0.3 ); border-radius : 10px ; } ::-webkit-scrollbar-thumb { border-radius : 10px ; -webkit-box-shadow : inset 0 0 10px rgba (150 , 150 , 150 , 0.5 ); } &::before { background : #fc625d ; border-radius : 50% ; box-shadow : 20px 0 #fdbc40 , 40px 0 #35cd4b ; content : ' ' ; height : 12px ; left : 16px ; margin-top : -22px ; position : absolute; width : 12px ; } } .highlight { border-radius : 5px ; } .table-container { border-bottom-left-radius : 5px ; } }
设置文本框圆角边框
在\themes\next\source\css\_variables目录下边,根据自己选择的主题风格打开相应的文件,修改相关参数即可:
1 2 3 4 // $border-radius-inner = initial; // $border-radius = initial; $border-radius-inner = 15px; $border-radius = 15px;
设置板块透明度
打开themes\next\source\css\_schemes目录,根据自己选择的主题风格,进入相应的目录,分别打开相应版块的文件,修改background参数:
1 background: rgba(255,255,255,0.6); //0.6是透明度,可自行修改
设置头像
打开themes/next/下的_config.yml,查找avatar
1 2 3 4 5 avatar: url: /images/avatar.gif rounded: false rotated: false
添加背景图片
将背景图片放在 themes/next/source/images 目录下;
在 themes/next/source/css/_schemes/ 目录下自己选择的主题下的 index.styl 文件中添加以下代码:
1 2 3 4 5 6 7 8 9 10 11 12 13 14 15 16 17 18 19 20 21 22 23 24 25 26 27 28 29 30 31 32 33 34 35 36 37 38 39 40 41 42 43 44 45 46 47 48 49 50 51 52 53 54 55 56 57 58 59 60 61 62 63 64 65 66 67 68 69 70 71 72 73 //添加背景图片 body { background : url (../images/background.jpg); background-repeat : no-repeat; background-attachment : fixed; background-position : 50% 50% ; background-size : cover; -webkit-background-size : cover; -o-background-size : cover; -moz-background-size : cover; -ms-background-size : cover; } //设置表格透明度 table { opacity : 0.9 ; } //设置标题字体大小 h1 { font-size : 1.6em ; } //设置按钮样式 .btn { background : #f4f4f4 ; border : 1px solid #555 ; border-radius : 6px ; color : #555 ; font-size : 0.9em ; opacity : 0.8 ; } //侧边栏背景颜色及透明度 .sidebar { background : rgba (255 ,255 ,255 ,0 ); } //侧边栏社交连接字体大小 .links-of-author { font-size : 0.7em ; } //侧边栏头像下边日志/分类/标签字体大小 .site-state { font-size : 0.9em ; } //设置侧边栏目录字体大小 .sidebar-inner { font-size : 1.38em ; } //回到顶部按钮边框及透明度 .back-to-top .back-to-top-on { opacity : 0.8 ; border-radius : 15px ; } //代码块透明度 .highlight-wrap { opacity : 0.95 ; } //版权声明透明度 .post-copyright { opacity : 0.8 ; } //最底部信息字体大小 .footer-inner { font-size : 1.21em ; }
设置动画效果
1 2 use_motion: true use_motion: false
设置背景动画 共有两种动画,其中three_waves 在版本 5.1.1 中引入。只能同时开启一种背景动画效果。
下载插件
1 git clone https://github.com/theme-next/theme-next-canvas-nest source /lib/canvas-nest
编辑主题配置文件,搜索 canvas_nest
1 2 3 4 5 6 7 canvas_nest: enable: true onmobile: false color: "0,0,255" opacity: 0.6 zIndex: -1 count: 99
进入theme/next目录
执行命令:
1 git clone https://github.com/theme-next/theme-next-three source /lib/three
将themes/next/_config.yml中查找three字段,将想要的效果改为true即可:
1 2 3 4 5 6 three_waves: false canvas_lines: true canvas_sphere: false
添加背景音乐
修改 themes/next/layout/_macro/sidebar.swig 文件,在如下位置添加音乐播放器内容:
1 2 3 4 5 6 7 8 9 10 11 12 <div class ="site-overview-wrap sidebar-panel" > {{ partial('_partials/sidebar/site-overview.swig', {}, {cache: theme.cache.enable}) }} {{- next_inject('sidebar') }} </div > <div > {% if theme.background_music %} <iframe frameborder ="no" border ="0" marginwidth ="0" marginheight ="0" width =210 height =88 " src ="{{ theme.background_music }}" > </iframe > {% endif %} </div >
注册网易云账号,新建歌单,添加音乐,获取歌单的外链;
将复制出的代码中src字段的内容加入themes/next/_config.yml 配置文件中,将height=90改成66,具体格式如下:
1 background_music: //music.163.com/outchain/player?type=0&id=4261269969&auto=1&height=66"
主页轮播图
关于如何添加主页轮播图在另一篇文章【在Hexo+NexT博客中添加主页轮播图 】有详细介绍。
设置鼠标点击特效
关于如何设置鼠标点击特效在另一篇文章【在Hexo+NexT博客中设置鼠标点击特效 】有详细介绍。
修改中文字体
前往 Google Fonts 查看合适的字体
打开 themes/next/ 下的 _config.yml,查找 font
1 2 3 4 5 6 7 8 font: enable: true host: https://fonts.loli.net global: external: true family: Noto Serif SC // 挑选的字体 size:
修改 /themes/next/source/css/_variables/base.styl
1 2 $font-family-monospace = consolas, Menlo, $font-family-chinese, monospace $font-family-monospace = get_font_family('codes'), consolas, Menlo, $font-family-chinese, monospace if get_font_family('codes')
将以上代码修改为:
1 2 $font-family-monospace = consolas, Menlo, $font-family-base, monospace $font-family-monospace = get_font_family('codes'), consolas, Menlo, $font-family-base, monospace if get_font_family('codes')
修改字体大小
在themes/next/_config.yml中搜索Font,可以修改。
1 2 3 4 5 6 7 8 9 10 11 12 13 14 15 16 17 18 19 20 21 22 23 24 25 font: enable: true host: global: external: true family: Monda headings: external: true family: Roboto Slab posts: external: true family: logo: external: true family: Lobster Two size: 24 codes: external: true family: PT Mono
上述方法不太理想,还可以在themes\next\source\css\_variables\base.styl中修改。
1 2 3 4 5 6 7 8 9 // Font size $font-size-base = (hexo-config('font.enable') and hexo-config('font.global.size') is a 'unit') ? unit(hexo-config('font.global.size'), em) : .75em; //整体大小 $font-size-smallest = .7em; //首页阅读时长等 $font-size-smaller = 1.11em; //侧边栏(归档等) $font-size-small = .82em; //侧边栏目录、阅读全文按钮、文中表格及代码块 $font-size-medium = 1em; //头像下边日志、分类、标签 $font-size-large = 1.3em; //首页文章标题及文章内容 $font-size-larger = 1.25em; $font-size-largest = 2em; //用户名
设置菜单及页面
打开 themes/next/ 下的 _config.yml,查找 menu,去掉#注释即可显示对应的菜单项,也可自定义新的菜单项。 ||之前的值是目标链接,之后的是分类页面的图标,图标名称来自于 FontAwesome icon 。若没有配置图标,默认会使用问号图标。
1 2 3 4 5 6 7 8 9 menu: home: / || home tags: /tags/ || tags categories: /categories/ || th archives: /archives/ || archive
新添加的菜单需要翻译对应的中文,打开 hexo/theme/next/languages/zh-CN.yml,在 menu 下自定义,如:
创建分类页面
将主题配置文件中 menu 下方 categories 前的注释去掉。
在终端窗口下,定位到 Hexo 站点目录下,新建:
1 2 $ cd <站点目录> $ hexo new page categories
此时在根目录的source文件夹下会生成一个categories文件,文件中有一个index.md文件,修改内容如下:
1 2 3 4 5 6 --- title: 分类 date: 2017-12-14 13:05:38 type: "categories" comments: true ---
注:如果有启用评论,默认页面带有评论。需要关闭的话,添加字段comments并将值设置为false。
创建标签页面
将主题配置文件中 menu 下方 tags 前的注释去掉。
在终端窗口下,定位到 Hexo 站点目录下,新建:
1 2 $ cd <站点目录> $ hexo new page tags
一篇文章有多个标签时按下面的格式填写:
1 2 3 4 5 6 --- title: 标签测试文章 tags: - Testing - Another Tag---
创建关于页面
将主题配置文件中 menu 下方 about 前的注释去掉。
在终端窗口下,定位到 Hexo 站点目录下,新建:
1 2 $ cd <站点目录> $ hexo new page about
此时在根目录的 source 文件夹下会生成一个 about 文件,文件中有一个index.md文件,修改内容如下:
1 2 3 4 5 --- title: 个人简介 comments: true date: 2020-07-18 16:12:21 ---
注:如果有启用评论,默认页面带有评论。需要关闭的话,添加字段comments并将值设置为false。
修改标签样式 博客底部的标签样式默认为#tag,我们可以将其改成:
在 /themes/next/layout/_macro/post.swig文件中搜索 rel=”tag”>:
1 <a href="{{ url_for(tag.path) }}" rel="tag">{{ tag_indicate }} {{ tag.name }}</a>
修改为:
1 <a href="{{ url_for(tag.path) }}" rel="tag"><i class="fa fa-tag"></i> {{ tag.name }}</a>
归档/标签/分类页美化
关于归档/标签/分类页的美化在另一篇文章【Hexo+NexT博客归档/标签/分类页美化 】有详细介绍。
设置侧边栏
设置显示位置:打开themes/next/下的_config.yml,查找sidebar
1 2 3 sidebar: position: left
侧边栏目录
1 2 3 4 5 6 7 8 9 toc: enable: true number: true wrap: true expand_all: false max_depth: 6
侧边栏滚动条样式 默认的侧栏滚动条其实挺丑的,添加如下代码重新渲染页面就可以修改侧栏滚动条了。
文件位置:/themes/next/source/_schemes/ 相应主题的 index.styl文件:
1 2 3 4 5 6 7 8 9 10 11 12 13 14 15 16 17 18 19 20 21 22 23 24 25 26 27 28 29 30 31 32 33 34 35 ::-webkit-scrollbar { width : 10px ; height : 10px ; } ::-webkit-scrollbar-button { width : 0 ; height : 0 ; } ::-webkit-scrollbar-button :start :increment ,::-webkit-scrollbar-button :end :decrement { display : none; } ::-webkit-scrollbar-corner { display : block; } ::-webkit-scrollbar-thumb { border-radius : 8px ; background-color : rgba (0 ,0 ,0 ,.2 ); } ::-webkit-scrollbar-thumb :hover { border-radius : 8px ; background-color : rgba (0 ,0 ,0 ,.5 ); } ::-webkit-scrollbar-track ,::-webkit-scrollbar-thumb { border-right : 1px solid transparent; border-left : 1px solid transparent; } ::-webkit-scrollbar-track :hover { background-color : rgba (0 ,0 ,0 ,.15 ); } ::-webkit-scrollbar-button :start { width : 10px ; height : 10px ; }
侧边栏社交链接
链接放置在主题配置文件中的 social 字段下,一行一个链接。其键值格式是 显示文本: 链接地址。
1 2 3 4 5 6 7 8 social: GitHub: https://github.com/your-user-name Twitter: https://twitter.com/your-user-name 微博: http://weibo.com/your-user-name 豆瓣: http://douban.com/people/your-user-name 知乎: http://www.zhihu.com/people/your-user-name
设定链接的图标,对应的字段是 social_icons。其键值格式是 匹配键: Font Awesome 图标名称, 匹配键 与上一步所配置的链接的 显示文本 相同(大小写严格匹配),图标名称 是 Font Awesome 图标的名字(不必带 fa- 前缀)。 enable 选项用于控制是否显示图标,你可以设置成 false 来去掉图标。
1 2 3 4 5 6 7 social_icons: enable: true GitHub: github Twitter: twitter 微博: weibo
侧边栏友情链接
1 2 3 4 5 links_title: Links links: MacTalk: http://macshuo.com/ Title: http://example.com/
腾讯公益404页面
1 2 3 4 5 6 7 8 9 10 11 12 13 14 15 16 17 18 <!DOCTYPE HTML > <html > <head > <meta http-equiv ="content-type" content ="text/html;charset=utf-8;" /> <meta http-equiv ="X-UA-Compatible" content ="IE=edge,chrome=1" /> <meta name ="robots" content ="all" /> <meta name ="robots" content ="index,follow" /> <link rel ="stylesheet" type ="text/css" href ="https://qzone.qq.com/gy/404/style/404style.css" > </head > <body > <script type ="text/plain" src ="http://www.qq.com/404/search_children.js" charset ="utf-8" homePageUrl ="/" homePageName ="回到我的主页" > </script > <script src ="https://qzone.qq.com/gy/404/data.js" charset ="utf-8" > </script > <script src ="https://qzone.qq.com/gy/404/page.js" charset ="utf-8" > </script > </body > </html >
生成唯一文章链接
首先需要安装一个插件,用于根据帖子标题生成静态帖子链接,博客站点下执行下面命令:
1 npm install hexo-abbrlink --save
执行此命令可能会不成功,提示你缺少相应的依赖,比如babel-eslint、mini-css-extract-plugin、webpack-cli…eslint@4.x babel-eslint@8 –save-dev
修改站点配置文件 config.yml 文件中的永久链接:
1 permalink: posts/:abbrlink.html
在 permalink 下面写入下面的内容:
1 2 3 4 abbrlink: alg: crc32 rep: hex
回到顶部按钮
NexT主题自带的样式:
在themes/*/_config.yml中搜索back2top,将enable属性的false改为true即可:
1 2 3 4 5 6 back2top: enable: true sidebar: true scrollpercent: true
自定样式:
1 2 3 4 5 6 7 8 9 10 11 12 13 14 15 16 17 .back-to-top { //right: 60px; width: 70px; //图片素材宽度 height: 900px; //图片素材高度 top : -900px ; bottom : unset ; transition : all .5s ease-in-out ; background: url("/images/scroll.png"); //隐藏箭头图标 > i { display : none; } &.back-to-top-on { bottom : unset; top : 100vh < (900px + 200px ) ? calc ( 100vh - 900px - 200px ) : 0px ; } }
修改 background 里的 url 地址,下载图片 保存为 scroll.jpg 放到 themes/next/source/images 目录下边
阅读进度条
在themes/*/_config.yml中搜索reading_progress,修改相关信息:
1 2 3 4 5 6 7 reading_progress: enable: true position: top color: "#37c6c0" height: 3px
页面加载进度条
进入博客文件夹的/themes/next文件夹下
下载安装 Progress module,如下:
1 git clone https://github.com/theme-next/theme-next-pace source /lib/pace
在/themes/next/_config.yml中设置,如下
1 2 3 4 5 6 7 8 9 pace: enable: true theme: flash
添加搜索功能
安装 hexo-generator-searchdb,在站点的根目录下执行以下命令:
1 $ npm install hexo-generator-searchdb --save
编辑站点配置文件,新增以下内容到任意位置(7.5+版本不加也可以):
1 2 3 4 5 6 7 8 9 10 11 12 13 14 15 16 17 18 19 search: path: search.xml field: post format: html limit: 10000 content: true
编辑 主题配置文件,启用本地搜索功能:
1 2 3 local_search: enable: true
博文置顶
安装插件
1 2 $ npm uninstall hexo-generator-index --save $ npm install hexo-generator-index-pin-top --save
然后在需要置顶的文章的Front-matter中加上top(正数)即可,top值越大的越靠前显示。
1 2 3 title: 2018 date: 2018-10-25 16:10:03 top: 10
设置置顶标志,打开:/themes/*/layout/_macro/post.swig,定位到<div class=”post-meta”>标签下,插入以下代码即可:
1 2 3 4 5 {% if post.top %} <i class ="fa fa-thumb-tack" > </i > <font color =green > 置顶</font > <span class ="post-meta-divider" > |</span > {% endif %}
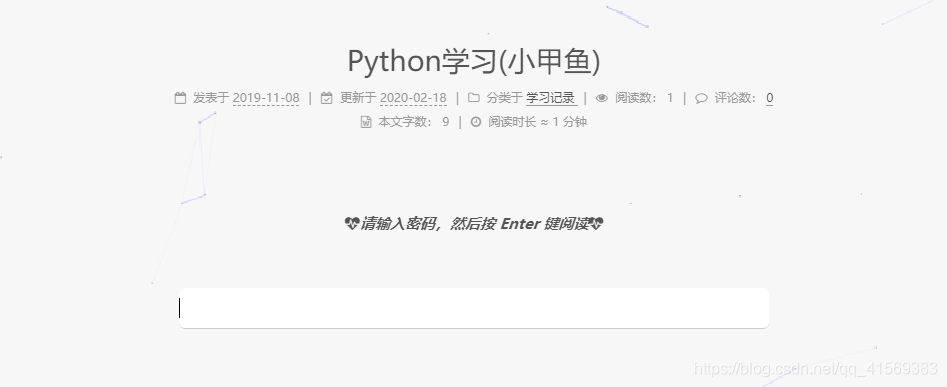
自定义样式博文加密
在目录 /themes/next/layout/ 下的 _layout.swig 中,找到main标签添加如下代码:
1 2 3 4 5 6 7 8 9 10 11 12 13 14 15 16 17 18 <main id ="main" class ="main" > <div class ="main-inner" > <div class ="content-wrap" > <div id ="content" class ="content" > {% block content %}{% endblock %} </div > {% include '_third-party/duoshuo-hot-articles.swig' %} {% include '_partials/comments.swig' %} </div > {% if theme.sidebar.display !== 'remove' %} {% block sidebar %}{% endblock %} {% endif %} </div > {% include 'password.swig' %} </main >
在目录 /themes/next/layout/ 下创建 password.swig ,内容如下:
1 2 3 4 5 6 7 8 9 10 11 12 13 14 15 16 17 18 19 20 21 22 23 24 25 26 27 28 29 30 31 32 33 34 35 36 37 38 39 40 41 42 43 44 45 46 47 48 49 50 51 52 53 54 55 56 57 58 59 60 61 62 63 64 65 66 67 68 69 70 71 72 73 74 75 76 77 78 79 80 81 82 83 <script src ="https://cdn.staticfile.org/jquery/3.1.1/jquery.min.js" > </script > <script > var div = $('.post-body' ); var toc=$('.post-toc' ); function password () if ('{{ page.password }}' ){ div.remove(); toc.remove(); $('.post-header' ).after( '<span class ="description" value ="请输入密码,然后按 Enter 键阅读" style ="font-style: oblique;font-weight: bold;border: none;display: block;'+ 'width: 60%;margin: 0 auto;text-align: center;outline: none;margin-bottom: 40px;resize:none ">' + '<i class ="fa fa-heartbeat" id ="myheartbeat" > </i > '+ ' 请输入密码,按回车键进入 ' + '<i class ="fa fa-heartbeat" id ="myheartbeat" > </i > '+ '</span>' + '<div class ="qiang" style ="height: 100px;width: 60%;margin:0 auto" > ' + '<input class ="password" type ="password" autocomplete ="new-password" autofocus ="autofocus" value ="" style ="border-radius: 5px;height: 30px;border: none;display: block;border-bottom: 1px solid #ccc;' + 'margin: 0 auto;outline: none;width:95%"/>' + '</div>' ) document .onclick = function (event ) var e = event || window .event; var elem = e.srcElement || e.target; while (elem) { if (elem != document ) { if (elem.className == "password" ) { return ; } elem = elem.parentNode; } else { return ; } } } $(document ).keyup(function (event ) if (event.keyCode ==13 &&$('.password' ).length>0 ){ if ($('.password' ).val() == '{{ page.password }}' ) { (div).appendTo($(".post-header" )) toc.appendTo($(".sidebar-inner" )) $(".description" ).remove(); $(".qiang" ).remove(); $(".password" ).remove(); $('img' ).lazyload({ placeholder: '/images/loading.gif' , effect: 'fadeIn' , threshold : 100, failure_limit : 20, skip_invisible : false }); $(".post-block" ).css({opacity :1 }); $(".post-header" ).css({opacity :1 }); $(".post-body" ).css({opacity :1 }); $(".pagination" ).css({opacity :1 }); }else { alert("对不起,密码输入错误。" ) } } }); } } password(); </script >
使用方法:在文章开头加上password字段并设置密码即可,如下所示:
1 2 3 4 5 --- title: 测试 date: 2019-03-30 21:18:02 password: aaa ---
注意:如果自己的博客源码中的这篇文章上传到 github ,密码也就公诸于世了,可以在 push 到 github 的时候将这篇文章忽略。
首页显示文章摘要
打开themes/next/下的_config.yml,查找excerpt
1 2 3 auto_excerpt: enable: false length: 150
添加书签
在 themes/next/ 下的 _config.yml 文件中搜索 bookmark,修改相关信息:
1 2 3 4 5 6 7 8 9 bookmark: enable: true color: "#e8e8e8" save: auto
阅读更多按钮
打开themes/next/下的_config.yml,查找read_more_btn:
1 read_more_btn: true //显示全文按钮
在文章中添加<!–more–> ,其后面的内容在主页将不显示。
设置图片可放大
打开站点配置文件_config.yml,搜索fancybox字段,设置其值为true
进入到theme/text/文件夹下,打开git bash
git clone https://github.com/theme-next/theme-next-fancybox3 source/lib/fancybox
注:Next 7.5及以上版本不必下载。
添加评论系统-Valine
我们的评论系统其实是放在Leancloud上的,因此首先需要去注册一个Leancloud 账号
创建一个应用,名字可以随便起,然后进入应用->设置->应用key,获取appid和appkey
打开主题配置文件,搜索valine,填入appid和appkey:
1 2 3 4 5 6 7 8 9 valine: enable: true appid: <your app id> appkey: <your app key> notify: false verify: false placeholder: 快来输入你的评论吧...... guest_info: nick,mail,link pageSize: 10
在Leancloud -> 设置 -> 安全中心 -> Web 安全域名 把你的域名加进去。
添加阅读量统计
next自带的busuanzi统计,在themes/next/_config.yml中修改相关参数即可。
1 2 3 4 5 6 7 8 busuanzi_count: enable: true total_visitors: false total_visitors_icon: user total_views: false total_views_icon: eye post_views: true post_views_icon: eye
注:开启busuanzi之后,阅读量统计只在文章页面显示,在首页只显示文章摘要的时候不会显示,而且也无法管理阅读量的统计,因此建议采用第二种方法。
Leancloud
同添加评论功能一样,在Leancloud 账号中新建一个应用;
在新创建的应用中的存储模块下新建一个名为“Counter”的Class,名称必须为“Counter”;
在创建的新应用中进入应用->设置->应用key,获取appid和appkey;
打开主题配置文件,搜索leancloud_visitors,填入app_id和app_key:
1 2 3 4 5 6 7 8 9 leancloud_visitors: enable: true app_id: app_key: security: false betterPerformance: false
添加博客热门文章页面
为博客添加文章阅读量排行榜页面。前提是用Leancloud添加了阅读量统计(上文有提到),具体操作步骤如下:
在站点目录下打开Git Bash,新建top页面,即执行以下命令:
然后在主题配置文件/themes/next/_config.yml中menu下添加top:
1 2 menu: top: /top/ || signal
接着在语言翻译文件/themes/next/languages/zh_Hans.yml中加上top的中文翻译:
1 2 3 4 5 6 7 8 9 10 11 menu: home: 首页 archives: 归档 categories: 分类 tags: 标签 about: 关于 search: 搜索 schedule: 日程表 sitemap: 站点地图 commonweal: 公益404 top: 热门排行 /* 可以不为 热门排行,随便取 */
编辑第一步新建页面生成的文件,其中comments为设置该页面是否开启评论,文件位置:hexo/source/top/index.md:
1 2 3 4 5 6 7 8 9 10 11 12 13 14 15 16 17 18 19 20 21 22 23 24 25 26 27 28 29 30 31 32 33 34 35 36 37 38 --- title: 文章热度排行 comments: true date: 2019-11-03 14:37:48 type: --- <div id ="top" style ="margin-top:30px;" > </div > <script src ="//cdn1.lncld.net/static/js/3.0.4/av-min.js" > </script > <script > _id", "app_ key");</script > <script type ="text/javascript" > var time = 0 var title = "" var url = "" var query = new AV.Query('Counter'); query.notEqualTo('id', 0); query.descending('time'); query.limit(1000); query.find().then(function (todo) { for (var i = 0; i < 1000; i++) { var result = todo[i].attributes; time = result.time; title = result.title; url = result.url; var content = "<p class='my-article-top'>" + "<font color='#a7a7e5'>" + "➤【热度: " + "</font>" + "<font color='#f1a8ce'>" + time + " ℃】" + "</font>" + "<a href='" + url + "'>" + title + "</a>" + "</p>"; document.getElementById("top").innerHTML += content } }, function (error) { console.log("error"); }); </script > <style > display: none; } </style >
必须将里面的里面的 app_id 和 app_key 替换为你的主题配置文件中的值,必须替换里面博客的链接,1000是显示文章的数量,其它可以自己看情况更改。最后,修改样式可以在 custom.styl 中加入自定义代码,不过还有几点需要注意:
如果在设置 > 安全中心中,没有将 http://localhost:4000 加入 Web 安全域名,那么本地调试将看不到,可以先将之加入,调试完后删除。
如果你发现文章标题显示不对,这是由于更改过文章标题导致的,在存储 > Counter 双击title修改即可。
如果你的博客使用了 Valine 评论系统,那么可能会有代码冲突问题,解决方法可自行百度
添加字数统计和阅读时长
安装hexo-symbols-count-time
1 $ npm install hexo-symbols-count-time --save
如果安装完报如下提醒,还需安装eslint
1 npm WARN babel-eslint@10.0.1 requires a peer of eslint@>= 4.12.1 but none is installed. You must install peer dependencies yourself.
安装eslint
1 $ npm install eslint --save
修改themes/next/下的_config.yml中如下内容:
1 2 3 4 5 6 7 symbols_count_time: separated_meta: true item_text_post: true item_text_total: false awl: 4 wpm: 275 suffix: mins.
加入canvas粒子时钟
关于如何在博客中加入canvas粒子时钟在另一篇文章【在Hexo+NexT博客中加入canvas粒子时钟 】有详细介绍。
添加网站运行时间
加入到侧边栏,在hexo/themes/next/layout/_macro/sidebar.swig中合适位置加入以下代码:
1 2 3 4 5 6 7 8 9 10 11 12 13 14 15 16 17 18 19 20 21 22 23 24 25 26 27 <div id ="days" > </div > <script > function show_date_time () window .setTimeout("show_date_time()" , 1000 ); BirthDay=new Date ("05/27/2017 15:13:14" ); today=new Date (); timeold=(today.getTime()-BirthDay.getTime()); sectimeold=timeold/1000 secondsold=Math .floor(sectimeold); msPerDay=24*60*60*1000 e_daysold=timeold/msPerDay daysold=Math .floor(e_daysold); e_hrsold=(e_daysold-daysold)*24; hrsold=setzero(Math .floor(e_hrsold)); e_minsold=(e_hrsold-hrsold)*60; minsold=setzero(Math .floor((e_hrsold-hrsold)*60 )); seconds=setzero(Math .floor((e_minsold-minsold)*60 )); document .getElementById('days' ).innerHTML="已运行 " +daysold+" 天 " +hrsold+" 小时 " +minsold+" 分 " +seconds+" 秒" ; } function setzero (i) if (i<10) { i="0" + i }; return i; } show_date_time(); </script >
加入到页面底部,在themes\next\layout\_partials\footer.swig文件中合适位置加入以下代码:
1 2 3 4 5 6 7 8 9 10 11 12 13 14 15 16 17 18 <span id ="timeDate" > 载入天数...</span > <span id ="times" > 载入时分秒...</span > <script > var now = new Date (); function createtime () var grt= new Date ("09/15/2019 15:13:14" ); now.setTime(now.getTime()+250); days = (now - grt ) / 1000 / 60 / 60 / 24 ; dnum = Math .floor(days); hours = (now - grt ) / 1000 / 60 / 60 - (24 * dnum); hnum = Math .floor(hours); if (String (hnum).length ==1 ){hnum = "0" + hnum;} minutes = (now - grt ) / 1000 /60 - (24 * 60 * dnum) - (60 * hnum); mnum = Math .floor(minutes); if (String (mnum).length ==1 ){mnum = "0" + mnum;} seconds = (now - grt ) / 1000 - (24 * 60 * 60 * dnum) - (60 * 60 * hnum) - (60 * mnum); snum = Math .round(seconds); if (String (snum).length ==1 ){snum = "0" + snum;} document .getElementById("timeDate" ).innerHTML = "本站已安全运行 " +dnum+" 天 " ; document .getElementById("times" ).innerHTML = hnum + " 小时 " + mnum + " 分 " + snum + " 秒" ; } setInterval("createtime()" ,250 ); </script >
添加板娘live2d模型
板娘原生使用文档 ,但是原生的其实不是很好用,这里我推荐一个只需要引入一个js文件就能实现看板娘的方法,这个作者对Live2d模型进行了深度优化,可以根据鼠标放置和点击内容的不同进行一定的提示信息,并且代码中设置了一年中特殊节日的祝福语,具体设置方法如下:
去live2d-widget 下载源代码并解压到 themes/next/source/lib/ 下;
然后打开下载文件中的 autoload.js 文件,修改以下代码:
1 2 const live2d_path = "/lib/live2d-widget/" ;
上面那个地址表示在本地引用,然后打开 themes/next/layout/_layout.swig 文件,在其中引入 js 文件如下:
1 <script src ="/lib/live2d-widget/autoload.js" > </script >
打开主题配置文件 themes/next/_config.xml 文件,在其中末尾添加:
最后,想修改看板娘大小、位置、格式、文本内容等,可查看并修改 waifu-tips.js 、waifu-tips.json 和 waifu.css 三个文件。
添加Fork me on GitHub
第一种方法:next自带,在主题配置文件中搜索github_banner,注意要将yourname改为自己的:
1 2 3 4 github_banner: enable: true permalink: https://github.com/yourname title: Follow me on GitHub
第二种:有多种样式供选择,具体方法如下:
1 2 3 4 5 6 <body itemscope itemtype ="http://schema.org/WebPage" > <div class ="container{%- if theme.motion.enable %} use-motion{%- endif %}" > <div class ="headband" > </div > <a href ="https://github.com/jrbw0910" > <img width ="149" height ="149" src ="https://github.blog/wp-content/uploads/2008/12/forkme_right_darkblue_121621.png?resize=149%2C149" class ="attachment-full size-full" style ="float:right" alt ="Fork me on GitHub" data-recalc-dims ="1" > </a >
订阅微信公众号
此特性在版本 5.0.1 中引入,要使用此功能请确保所使用的 NexT 版本在此之后。
在每篇文章的末尾显示微信公众号二维码,扫一扫,轻松订阅博客。
在微信公众号平台下载您的二维码,并将它存放于博客source/uploads/目录下。
然后编辑 主题配置文件,如下:
1 2 3 4 5 wechat_subscriber: enabled: true qcode: /uploads/wechat-qcode.jpg description: 欢迎您扫一扫上面的微信公众号,订阅我的博客!
添加打赏功能
在themes/next/_config.yml中搜索reward,修改内容,并在指定路径下放置自己的支付二维码。
1 2 3 4 5 6 7 8 9 reward_settings: enable: false animation: true comment: 感谢您的支持! reward: wechatpay: /images/wechatpay.jpg alipay: /images/alipay.jpg
文末添加版权声明 1 2 3 4 5 creative_commons: license: by-nc-sa sidebar: false post: true language:
常用操作
init:新建一个网站。如果没有设置 folder ,Hexo 默认在目前的文件夹建立网站。
new
1 $ hexo new [layout] <title>
参数名
功能
文章路径
post
新建博文
source/_posts
page
新建页面(如404,分类)
source
draft
草稿
source/_drafts
generate:生成静态文件。
publish:发表草稿。
1 $ hexo publish [layout] <filename>
server:启动服务器。默认情况下,访问网址为: http://localhost:4000/。
deploy:部署网站。
clean:清除缓存文件 (db.json) 和已生成的静态文件 (public)。
在某些情况(尤其是更换主题后),如果发现您对站点的更改无论如何也不生效,您可能需要运行该命令。
version:显示 Hexo 版本。
默认可以使用的Front-matter(就是博文最上方以 — 分隔的那部分):
参数
描述
默认值
layout
布局
title
标题
description
文章描述
password
文章密码
keywords
文章关键字
comments
设置是否开启评论
true
tags
标签(不适用于分页)
categories
分类(不适用于分页)
permalink
覆盖文章网址
date
建立日期
文件建立日期
updated
更新日期
文件更新日期
参考: